
One thing I've come to realize is that it's important to focus on the result, rather than the tools you can't (yet) afford - especially in this industry. Recently I found an amazing location and I HAD to shoot something there. In my mind, I could see this awesome crane shot...but in my wallet I had nothing to support that vision. So, instead of accepting my crane-less situation, I followed my childhood MacGyver days and decided to try something else. What if the cheapest slider on the market could achieve a similar result?
And here it is ...

I'm not claiming to have been the first to try this, not at all. Neither am I suggesting that these shots are just as good as crane shots. I'm simply sharing a result that came from MacGyver style thinking....AND making a point that it's usually YOU who limits the outcome of a shot, not your lack of gear.
So for the past three years or more, I've had many amazing experiences shooting films, commercials and documentaries, all over the world. It all started when I decided to try and balance my Canon 5D Mark II on the second-hand Glidecam 4000 Pro that I purchased on eBay, year 2008. Here's my reel showing what can be done with a lot of practice and an open mind.

Since RED came into my world however, I've had to change my way of thinking. Not only does shooting RAW change everything, but so does the fact that my new camera weighs at least triple what my DSLR did. Spontaneous flying with my Glidecam 4000 Pro days (no vest/no arm) are over! And those days were awesome :) That's pretty depressing, and so is the fact that if I DID want to fly with the Scarlet, it turns out that after some heavy research I'll need to buy, at a minimum, a Steadicam Zephyr to get any sort of professional results...well....that's close to $10k worth of kit....but wait!! There's got to be a way!! What would MacGyver do?
According to their website, the Glidecam 4000 Pro supports up to 8lbs of weight. When you have a battery, lens, REDMag, Monitor, matte-box, follow-focus and let's not even go there with a Samurai, you're looking at a rig that is WAY over the weight spec. But I had to try it anyway :) At first it was really just a fun joke, to see if I could actually mount this massive heavy rig onto my trusty Glidecam. Initially, it seriously was a joke. I could barely pick the thing up, let alone balance or fly it. In an attempt to balance the weight from the top and match the bottom, I had to use 6 weights either side to get it anywhere NEAR stable. But even then, it was quite clear that I needed a new Glidecam...or something the pro's recommended, a Steadicam.
For the next few days I tried several different setups. Frustration began to settle in. Nothing was working. I knew that I had to configure the rig to be as as light as possible. It was clearly far too top heavy and the weight needed to be distributed down below. So, my first inkling was to take the battery and screen from up top and place them down below....the problem was, I didn't have a long enough power cable. Or did I?
DO NOT TRY THIS (unless you really want to)
In order NOT to purchase an expensive long enough power extension cable OR an expensive belt-battery-plate from RED, you need to cut your power adapter cord and re-wire your battery plate that you purchased from eBay ;) Below are my hand-drawn schematics that show the wires inside the power cable and what they do. Note that the tiny cables (the blue and orange ones) are for things like battery percentage and other proprietary things. You don't need to worry about them when constructing this ghetto rig, they do not have anything to do with actually powering the camera. Basically, you need to connect the Yellow and Blue wires together to form your NEGATIVE wire, and the White and Red wires together to form you POSITIVE wire. Now, on your battery plate, solder them into position according to the + and - indicators. Once that is done, you need to run the wire inside the Glidecam's pole and mount the plate on the bottom of the base plate.
But SERIOUSLY! Do not try this unless you know what you are doing, or you at least have a kick-ass grandpar who has a multimeter ;)

Re-assembling the red cable is tricky because of the metal sleeves....you'll figure it out ;)
INVESTMENT
- Glidecam X-10 arm and vest
- Glidecam 4000 Pro
- Sacrifice of the RED Power cable (not recommended)
- Electrical tape (RED of course)
- A generic V-mount battery plate
- Quality time with my Grandpa (an engineer and a cracker of a camera assistant - there he is below)

My awesome pop, Jacques Poldermans, ready to reflect like a boss.
THE SETUP
You'll need to drill holes into the pole at the top and bottom, my good bro Trav did this for me :) Once I had the wires run, I managed to balanced my rig with a wireless follow focus and lightweight matte-box as you can see below.


It's far from perfect, but it's also far from $10K. "Real", "Professional" Steadicamers will scoff at my rig (and already have), but I doubt they'd scoff at my results if I said it was shot with the latest Ultra2c. There's a lot of name dropping, brand bias bullshit out there, and then there's people who get the job done. When I can justify the purchase of something more high end, I will...and that goes for all of my equipment too. But in the mean time, I sure as hell will try my best to get the shot I want, for as little money as possible. Besides, it's super fun trying and you learn a lot.

LATEST RESULTS (I shot this test video without a matte-box and without a follow-focus. This alowed me to add extra weight to the top, in this case, the Atomos Samurai).

Besides this test, I recently shot a few scenes for a short film with this a similar setup. The shot below required 6-stop HDRX to compensate for the exposure shift from full daylight outside, to low light inside.

ULTRA HEAVY
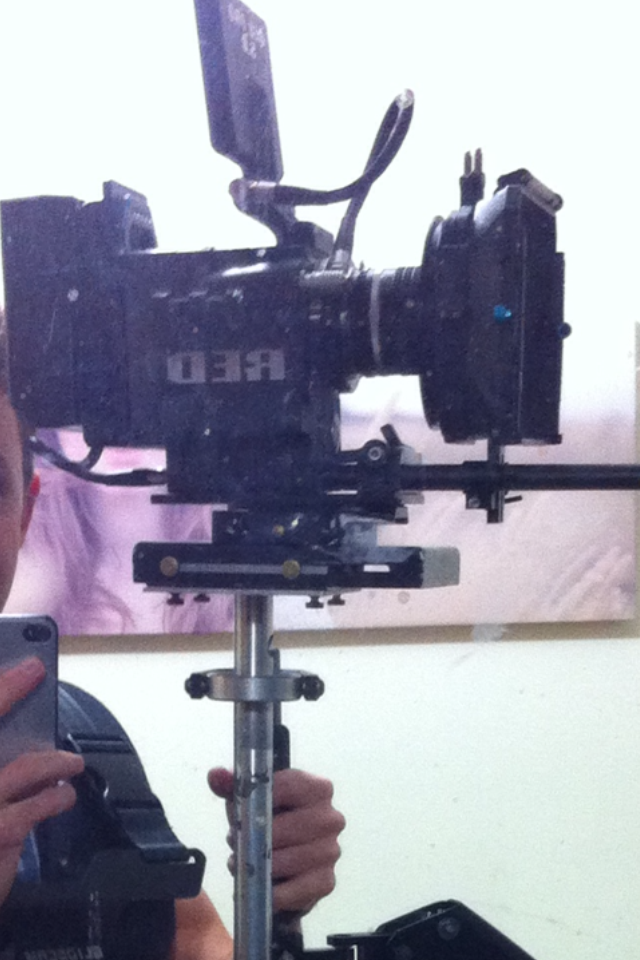
So can you fly this rig without an arm/vest? Sure, and I did for a few shots in a recent shoot, but if you're thinking slow smooth long takes, you're dreaming. I can fly the rig just with my arm for about 10 seconds...but it's more of battle than anything. One thing I've noticed however, is that when actually using the X-10 arm/vest, I find a heavier balance flies better. Obviously there is a limit (I went way too far with 2 batteries down below and some heavy gear up top) but, I've found that a heavier rig balances better. Below is a pic of a setup that was nicely balanced but was too heavy for the rig - the result was micro vibrations in the footage, no matter how carefully I walked.
So, is this the new combo? It's definitely more difficult to set up, but maybe it is, we'll see :) Just like I had to practice for days on end with my 5DII setup, it's now time to get some hours in with the RED :)
Also, I'd just like to say a BIG thanks to Robert Bonici for always being up for camera tests and adventures...you're a legend Ryob!! Thanks :)

Look how free I am hehe ;)
