
Every now and then I like push myself and try something new when it comes to lighting (as if I'm not under enough pressure on set as it is hehe). As I clinically watch and dissect other people's films (ruining the enjoyment of actually WATCHING the movie), I get inspired to try and re-create certain looks...of course, within the boundaries of the film I'm shooting and how the story needs to be told. That being said, I've noticed that SO MANY of the frames I enjoy the lighting of seem to have a common ground....
Overhead Soft Sources....
So, cool...sounds simple enough right? Just place some overhead soft lights above your actors!? Yeah right. Simple! Did I mention that nearly ALL of the films I've shot have been lit with my small, cheap lighting kit? That which includes a single C-stand outside of the generic small light stands. Occasionally I'll have a budget to hire a HMI or two, but even then, I often don't have the cutters, frames or support I need to get the most out of them. My point is, I'm trying to recreate lighting styles that have had mega bucks behind them, without the mega bucks. I'm trying to set up lights with very little help in very little time, with very little planning, AND with the wrong equipment. I don't have any soft lights other than LED's (which I place diffusion paper in front of) and let's be honest, they're not REALLY soft...not like a soft box and they're rather heavy!
So what's the solution? The first thing I had to consider outside of the light source itself, was how to rig it. Do I purchase another large C-Stand? There's $300...and that's without a boom arm. Meanwhile, I'll need a couple more shot bags too. The problem is, how heavy will my light be and will a C-Stand safely boom it over my actors heads? "Safe" is not the word I would use if I rigged an 800w redhead plus a softbox, plus a grid over my actors heads using a boom arm on a C-stand with two shot bags. If that thing tipped over (which it will), it could do some serious damage.
Then it was time to look at the light source it self - or more accurately, the light modifier (the soft box attachment) that would hopefully fit onto the front of my 650w fresnels. My first exploration into this world of soft light came from a studio shoot I did for Paul Nortan a while back (see the lighting setup here) where he had some generic softboxes attached to 800w redheads in his studio. I remember how hot those things got, and the burning smell that filled the room after about 20 minutes of them being turned on. It's always awkward when an actor asks about a burning smell...I just tell them there's nothing to worry about, other than a fire which could ignite at any moment. But of course, there are solutions to softboxing hot lights! Anyone got an absolute shit tonne of money? Me either. But if you do, check out CHIMERA's awesome kits! This medium sized one is designed to soften continuous tungsten lighting up to 2K.
(the above prices were grabbed from their website August 15th, 2016) http://chimeralighting.com/
Cool, so a single soft box is going to cost me MORE than it did for my 2 x 300w and 2 x 650w tungsten fresnels!?!? No thanks. I'd rather buy another lighting kit, a new set of filters or some C-Stands. But then hey, I'm still left wondering how I'm going to try out this over-head soft source lighting! Alternatives? Yeah, I found a few, but they were still super expensive and I kept on having visions of a hot heavy lights tipping over and cracking heads.
So what if I tried some light-weight, super cheap and nasty, fluro photography softboxs that you can find on eBay for about USD$33 each?? They come WITH the lighting fixture included. That's right. How about THIS KIT for AUD$139?? Well, that's exactly what I purchased :) Now, before you post some shit like "The Chimera's are an awesome piece of kit and will last you a life time. Do it right, buy quality"...please don't, unless you're willing to sponsor my next shoot ;)
Of course I was expecting colour accuracy to be low, and build quality to be lower. I wasn't wrong hehe :) If you've read any of my blog before, you'll know that that sort of thing never stopped me, and dare I say, never got in the way of great results.
The lights arrived in about three days. Awesome. After a quick assembly and power on, I was more than happy with the light's output and quality at first glace. I then had to figure out how to gel them (for tungsten) and focus the spill (soft boxes go everywhere!). When speaking about costly lighting accessories, how about this roll of CTO? $79. it was the only "large" roll they had that would fit the boxes. Fuck. Okay, and the grids? Well, I got a larger one and cut it in half which really made life hell, but yeah, that cost $39 from Image Melbourne in Collingwood. That and the wire, gaffer tape and about three hours of my life...I think it was worth it....I think ;)

I wanted a design the lights so that I could easily (it hasn't been) add or remove diffusion, gels and the grid, all independently of each-other. I wired some lug type hooks to the skeleton of the box and well...it works....kind of.
The hardest part was recreating an edge for the cut grid, and adding an additional flagging flaps to the edge of the box. I think I need to re-do them. As you can see, I didn't even bother flagging the edges of the second one, but I'll get around to it, when I can afford some more gaffer tape ;)
So! Are they durable? No.
Light accuracy spot on? No way.
A perfect alternative to a tungsten softbox? Not even close.
Easy to transport, assemble and disassemble? HELL NO.
BUT!!!!
Do I now own a set of lights that are safe to boom over an actor's head, super soft, super bright, focused, almost tungsten, almost daylight, SUPER affordable and something I can learn with whilst achieving awesome results?
FUCK YES I DO.
And let's be honest, a little DIY is always fun! I cannot wait to see how useful these babies will be on my next shoot!
Meanwhile, back to the film that I shot using these for the first time. We'll get to the frame at the top of this post in a minute, but first take a look at some BTS shots of how I used them recently (both daylight and tungsten balanced). Oh, and we had 3 C-Stands on this shoot....what a luxury!
And here's the result (with a wacky grade):
Below is another scene where I used them, this time daylight balanced.
Obviously there is a lot more lighting going on than just the overheads, but man, let me tell you they are a treat to play with and I'm seriously loving the results :) ANYWAY! Back to the hero shot :)
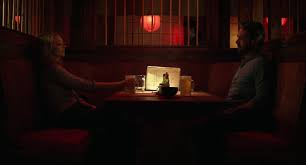
The scene we're talking about has our hero character Ash (Robin Brown), desperate and on the edge, meeting in a club owned by a notoriously dangerous man. I wanted to keep the classy vibe of the club, but also keep it dark (make it darker). The club location we had access to was amazing. With lots of red around, myself and production designer Kate Ditton agreed to keep that colour strong and work with it. I had recently been inspired by the lighting in a film called The Forest (2016). Here's the only frame grab of the scene that I could find (shitty res I know), but at least you'll get an idea of what got me excited. Did I have this image on set? No. It was something that stuck in my mind though. Looking at it now, there's definitely some overhead soft source going on...right? Right. hehe ;) On a side note, Chinese lanterns are something I'm yet to play with....that will be another blog post I promise.
I'll often see some amazing lighting in a film and get all excited about trying to recreate it. The problem is though, sometimes I'm waiting for a month or more for the right job to come along (or any job at all). During those down times, I'll ring some friends and try to organize a small test shoot, or incorporate that test into a workshop. That way I'm building my lighting skill set and experience, and sharing that experience with others...it's awesome :)
Above is the lighting diagram and setup for the shot I got in the end.
First things first, I turned the house lights off. I then proceeded to place the overhead above the table, then filling the faces with the red bounce from the LED. I placed the other soft box on the floor for some soft fill and wrap for Jackson (middle). I switched all of the bulbs in that soft box off, except two and with the grid I wasn't too worried about losing contrast with spill lighting my background. So much easier than bouncing a 300w and trying to cut it!
The yellow flood (top right) was actually an existing light in the club, so I used it to my advantage and loved it! The 650w gelled teal (top left) was a choice I made to help with colour contrast. If I had left it tungsten or gelled it yellow or red, the subtle blues in the background wall paintings would have seemed off. I think the teal compliments that background colour, along with the blue in Dennis' shirt (right), the blue in the book, and also subtly gives Jackson (middle) an edge. All of that is then exaggerated by the smoke in the room from the cigarette and the pro-mist filter which ads a slight glow to the highlights.
There was no room for our tripod to fit in that space and we didn't have a high-hat. This meant that I had to rest RED Dragon Weapon camera on my knees...not ideal, since it wasn't perfectly straight (I've had to fix that in post) and the frame moves ever so slightly throughout the scene. Meanwhile, the film is done and I'm lucky enough to be editing and grading it :) Cannot wait to share it! This scene is one of my favs :) There will be more lighting diagrams coming from this film, so stay tuned and thanks for visiting!
Matt
